ESLife

Posts in the camping category

Surviving the Wire Ring Saw

There are many types of Wire Ring saws out there. They are included in most survival kits. Wire Saws are light weight and they are supposed to cut through wood, metal, plastic and bone. Wire saws can be handy out in the wilderness. They look cool in the survival kit but many perform poorly out in the field. The first rule of thumb is to buy a good one. That way they won't snap when you need one.

We sell a wire saw at Extremely-Sharp that has over 100 lbs breaking strain with a 24" sawing edge. With that type of strength it may well be the most effective wire saw available. Our saw cuts through wood, plastic, bone, and even soft metals. They are constructed with 8 strands of interwoven stainless steel wire.  We call it the strongest wire saw ever.

Wire Ring Saw
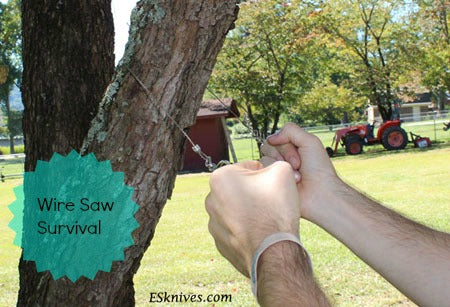
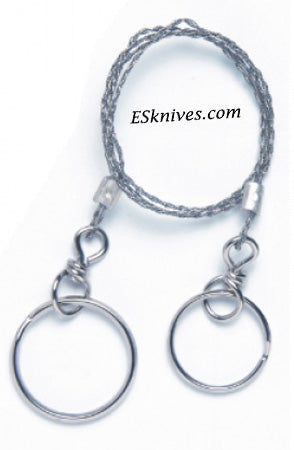
You can cut from the front or from back.  The most efficient method is the wrap around pull.   However you decide to use your saw it is much like flossing your teeth, nice long strokes.  The wire ring saw works well using the saw alone.  But a partner, one person on both ends make cutting faster and easier.The rings of the wire saw can hurt your finger.  The rings  get cold in winter.   There are some wire saws that come with nylon handles, but they are heavier in a pack and bulky in a survival kit.   An easy fix for handles is to take some additional para cord with you and make handles for your saw.  Most people in a survival situation have access to para cord.  When camping or backpacking para cord is a vital item to pack. Hand straps can save your fingers.

Start your cut small and slow.  As the cut deepens the surface area will increase.  With a even steady pull your speed can increase.

Remember that you are using energy when using your wire saw. If you are in a survival situation make sure the job is necessary before you expend the energy.


Wire SawYou don't want to let the saw blade get hot.
  The hotter the blade gets the more potential for snapping and breakage.   While cutting with your saw take some breaks and feel the blade.  If it does not burn your fingers it is OK to continue sawing.Wire saws are designed for smaller sticks.  In most survival and camping situations you will not need to cut large trees.  You never know when you might need to cut bone.  These saws cut bone fast and smooth.

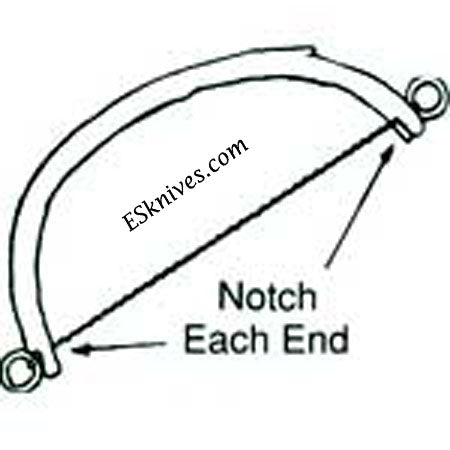
You can take your wire ring saw and turn it into a bow saw.  Find a smaller branch that can bend.  Green wood works best and is easier to make a bow with.  Notch both ends of your bow and string the bow with your wire saw.  Now you can saw from the top.   Don't rush it, let the saw do the work.  Using the bow saw means a  lot less effort and less calories.  Using the wire saw as a bow is one and half times faster than using a plain wire saw.   Using your saw in a bow helps prevent breakage of your saw, keeping your wire blade straight.

Wire Saw Diagram

A wire ring saw is a great addition for anyone whether for survival, backpacking or camping.  Wire saws don't weigh much and  well worth packing.Maintenance of the wire saw  is easy.   They store well.  It is important to keep a coat of oil on your saw to prevent rusting.  The oil will ensure years and years of hard use  from your saw.

When you are out practicing your survival skills your wire saw can be used for survival projects.  We have used our wire saw as a snare and have had good results.  With a little imagination the wire saw makes survival fun.

Posted by ES Team on 28 October, 2014 camping, get outdoors, how-to, survival | 0 comments | Read more →

Hobo Backpacking Stove Packs a Whole Lot of Power

Being a backpacker I am always looking for ways to lighten my pack. I thought I would look for a lightweight, easy to use stove that I could use wood as the fuel  That way I would not have to carry fuel and that would lighten my pack. I immediately thought about hobo stoves. Hobo Stoves are traditionally made from old coffee cans and use wood as the fuel source.  Of course a coffee can would be too big for my pack. Maybe I could make a smaller one.

I measured my backpacking pot that my kitchen fits in.  I needed a can that would be slightly larger than my pot.  That way my pot would slip in the stove for storage taking up less room in the pack.  Off to the grocery store I went with my measuring tape.  I started looking at cans and I started measuring.  I am sure I looked a little silly in the isles measuring cans.

I stopped in the Juice isle.  The large juice cans looked like they might be what I was looking for.  I measured and they were just the right size.  My pot would fit nicely inside the juice can.  I settled on the V-8 can.  Not because I like V-8 but because it seemed to be the strongest can.  I needed a can that would take a beating.

I got home and I started designing my stove. I think my design came out pretty well.

Here is our video explaining how we made the stove.

My son an I have taken this stove out on the trail several times. It performs well. Collecting a few sticks, using some tinder and a fire starter you are on your way to a hot meal. I have been able to boil water in around 8 minutes after lighting the tinder.

Here is our video using the stove and boiling water.

The pot will get black from soot with regular use. You can wash some of it off but everything fits into a sack so there is no dirt or soot in the pack.I did learn to use hardwoods when cooking. Pine tends to burn hot and leaves a resin on the pot.

My whole kitchen fits in the stove and then in a stuff sack. Takes up little room and weighs around 14 oz. The best part is that I don't have to carry fuel. I don't even have to carry tinder if I don't want too. I can find tinder on the trail. But a few cotton balls weigh almost nothing and are easy to light.

ESknives Hobo Stove
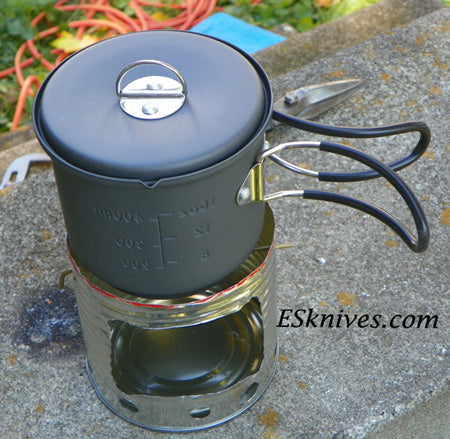
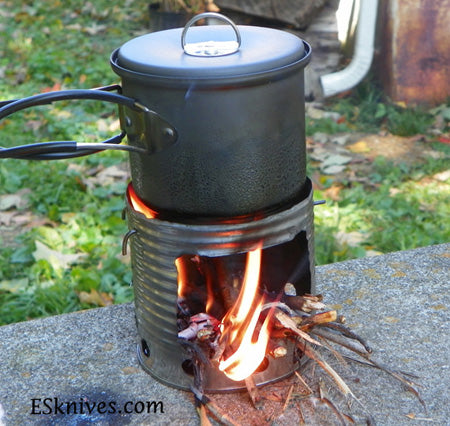
You can pack this stove and your alcohol stove. This stove makes a nice windbreak for the alcohol burner.

The Good – it’s very easy to make and there is plenty of fuel for it here in the Maine woods. A few handfuls of twigs and you’ll be able to boil a couple of cups of water in no time.

I like the way the stove focused the heat, which meant no wasted energy.

It’s lightweight and if you were so inclined carrying it around wouldn’t be a big deal.

I used hardwood twigs (oak) and there were very few sparks from this fire meaning that I’d feel comfortable using this stove in an area where there was a high fire hazard. By being extremely careful or through sheer dumb luck I’ve never lost control of a fire yet!

The Bad – it needs a lot of attention once you light it to keep it going. The wood used is fairly small and you need to feed it every five minutes or so or else the fire will go out.

If it’s raining starting this stove and keeping it going will be a bear. I haven’t tried it in the rain yet, but past experience with wood stoves tells me this will be tough to keep going unless you have a dry supply of wood on hand.

I’m going to replace the coat hanger with a couple of aluminum stakes the next time I use it.

Posted by ES Team on 26 October, 2014 camping, get outdoors, how-to | 0 comments | Read more →

Life as a Trailblazer

 
ESKnives Trailblazer
In our line of work, selling survival gear, knives, swords and other awesome things. We have adopted our favorite word that encompasses the many people we come across all the time- TRAILBLAZERS. The thing that our friends have in common (hikers, fishermen, hunters, outdoor enthusiast, explorers, adventure seekers, etc)... is their spirits define this awesome word.

Are you a trailblazer 
Are you a trailblazer?

Trailblazer defined 

Trailblazer: (n.) a person who makes a new track through wild country. Pioneer.

hikers trail sign  

The hiker symbol. Known to many at www.Extremely-Sharp.com

ESKnives Mountain View  

There are some views that only Trailblazers can enjoy. This hiker reached the peak and a remarkable view as a reward for their bold and adventurous hike.

ESKnives I'm a trailblazer

I am a trailblazer.  Pin this if you are one too!

Posted by ES Team on 17 October, 2014 camping, get outdoors, hobbies | 0 comments | Read more →

Top 7 Most Unique National Parks

Top 7 Most Unique National Parks
Looking for vacation ideas or summer travel plans? Don't worry, we've got your back! Get outdoors this year and turn your off time into an adventure you'll never forget! Here's a breakdown of some of the most unique national parks in the United States. You're welcome.

interesting national parks facts
 

7. Yosemite National Park

California

Best known for its magnificent waterfalls, Yosemite National Park is a shrine for beauty, including deep, rolling valleys, granite and glaciers, and so much more! This vast wilderness is home to grand meadows and vast, ancient sequoias where 7 present-day tribes place their history and roots.

Yosemite National Park waterfalls 

Yosemite offers an incredible variety of things to do including national park norms like biking, hiking, fishing, etc. as well as things unique to the park itself! Try water or winter sports depending on what time of year you’re visiting! There is also extensive bird watching and rock climbing like no other. Learn more about this classic attraction here and remember to get outdoors!

Yosemite National Park River 

6. Arches National Park

Utah

Arches National Park is a unique dreamlike setting that is a sunset colored sea of mystical sandstone arches; true to its name in every way. These sand deposit left over from ancient, evaporated salt seas create a picture perfect dream setting. Camp under the darkest of desert night skies or discover amazing views of shapes and sizes on 20 miles worth of winding trails that will challenge even the most experienced of hikers. Take a peak at more details of this wonderland here.

 Arches National Park Utah

There is nothing else like these incredible statues that paint the Utah desert red with cool shapes and sizes; they are truly unlike anything you've ever seen before!

 Arches National Park Utah Reds


5. St. Croix Island International Historic Site

Maine

Take a short ride from Acadia National Park along Maine’s coastal route one down east to a small site that carries a big history. Before Jamestown AND Plymouth Rock, this area of St. Croix Island housed a new French presence, a colony that like many others, almost didn’t make it. Sharing a border with Canada, this small and sacred island is nestled in the middle of the St. Croix River. So pack a lunch & grab your binoculars for a hike through history! This fragile reveal of the past is must-see.

4.  Katmai National Park and Preserve

Alaska


Katmai National Park and Preserve Lake 

This valley, created by the largest volcanic eruption of the 21st century, sits on the Alaska’s northern peninsula where brown bears quite literally out number people. A place where salmon are pink and plentiful, fishing with one of nature’s fiercest predators isn’t out of the question.

Katmai National Park and Preserve Bears Looking for trout 

Katmai is unlike any other national park and although this remote spot is difficult to get to, seeing as you must travel almost exclusively by boat or plane, it is definitely worth it for some of the best opportunities the natural world has to offer! Take a 45- minute Culture Walk with a native ranger, fish for rainbow trout over 30 inches in length, or if danger is more your style, you’re welcome to try bear wrestling… but our money’s on the bear! Visit the website for more details on the adventure of a lifetime… or watch a live stream of Brooks Fall’s bear cam here and watch the bears in their natural habitat.

3. Bighorn Canyon National Recreation Area

Montana, Wyoming

If you’ve never heard of Bighorn Canyon, you’re missin’ out! This national gem is cliff-encased lake just waiting to be discovered! Named after the bighorn sheep that make it their home, this can’t-beat sensation entertains a 71-mile long lake, huge mountains with 1,000 to 2,500 foot cliffs, Peregrine falcons, wild horses, and so much more (if that’s possible)!

Bighorn Canyon National Recreation Area Bighorn sheep 

The amazing waters and stories of those who have explored and settled on Bighorn River is what drives people to visit this creation of Yellowtail Dam. The ranches, fourteen different hiking trails, and over all archaeology of Bighorn Canyon is an inspiring awe just waiting to soak you in wonders! If you don’t believe us, check it out for yourself on their website.

Bighorn Canyon National Recreation Area 

 2. Chaco Culture National Historic Park

New Mexico

Don’t be discouraged by the rough terrain and beyond difficult access to Chaco Canyon, the adventure is worth it (& we’re not talkin’ about the shoes)! This World Heritage site is full of amazing history dating back even before Columbus sailed the ocean blue… you know, in 1492. The “Chaco” civilization left behind hundreds of sandstone buildings, impressive for their time & most definitely a must-see!

Today, visitors are able to travel back in time and immerse themselves in American history with guided walks or self-tours. Prepare to be amazed by the many backcountry trails or camp under the most unimaginably dark New Mexico night skies. Trust, this will definitely be one of your best ideas.

Chaco Culture National Historic Park 

1. Great Smokey Mountains National Park

North Carolina, Tennessee


Great Smokey Mountains National Park 

This famous landmark is number one on our list for a reason! A blanket of forest nestled in between the North Carolina and Tennessee border is home to magnificent wildlife, full of diversity. Not only is the wonder of the world America’s most visited National Park, it is home to the most ancient Southern Appalachian mountain culture.

The Smokies are great for camping, hiking, horseback riding, picnicking and so much more, with marvelous trails and pavilions; not to mention, the views! The best part, it never closes! Feel free to visit 24 hours a day, 365 days a year for FREE. Visit the website to find out more about this national treasure!

Some of our favorite destinations within the park include (but not limited to) Cades Cove, Cataloochee, Clingmans Dome, and Roaring Forks. Meanwhile the most popular activities are things like auto touring, bicycling, fishing, backpacking, waterfall walks, etc.

Great Smokey Mountains National Park River

Posted by ES Team on 11 October, 2014 camping, fishing, get outdoors | 0 comments | Read more →

How to Use The Backpacking Hobo Stove Great Survival Tool

Backpacking Hobo Stove Great survival tool

In the last article I explained how to make a hobo backpacking stove and now in this posting it seems appropriate to explain the why.

There are many different types of stoves to take with you to the back country. There are some very expensive and fancy stoves out there.   If money is an issue, there are some inexpensive stoves. There are many different types of fuels that can be chosen. White gas, butane, esbit,  and wood are just a few. The problem with many of your stoves is the weight. Most weigh over a pound and then you have your fuel. The more days you are out the more fuel you have to carry.

The wood stoves on the market are rather heavy but there is no fuel to carry. Esbit stoves are light weight but there is fuel that has to be carried. Esbit tablets don't weigh much but when you are trying to shave off pounds from your pack ounces count. For every 16 ounces you can shave off you have dropped the weight of your pack by a pound. In your living room a pound does not seem like much. After several days and 15 miles a day on the trail, each added pound becomes a burden.

Being an ultra lite backpacker, I am always trying to find ways to shave off ounces. The backpackers kitchen is a great place to focus on unneeded weight. I wanted to be able to get my whole kitchen, which means, stove, pot, tinder, fire starter and other cooking supplies, down to 16 ounces. To do that I would have to give up carrying fuel.

I have always been intrigued by hobo stoves. They are usually made with coffee cans and coffee cans are to large and to heavy to carry in the woods. Besides metal coffee cans are hard to find now a days. What I needed was a hobo design but smaller.


backpacking hobo stove survival tool


My son and I began to measure cans.  I am sure we looked a little funny at the local grocery store measuring cans.   We first measured soup cans.  We could of made a soup can work but it was smaller than we wanted and our pots would not fit inside a soup can.  After looking at many cans we decided on the classic V-8 can.  The V-8 can was workable, had a good weight and our pots would fit in the can, taking little space in the pack.

After we built the stove we had to try it out.  First we put our kitchen together and it fit in the pot tight. The stove and kitchen weighed in at 14 ounces. We beat our goal by 2 ounces.  The only thing left was to try it out.

We got some simple tinder, cotton balls, and some small sticks.  We started the cotton balls with our fire starter and started feeding sticks into the flames.  It was a great success, better than I imagined.  We had three cups of water boiling in 7 minutes. That is a lot of water to boil in a small amount of time. 

We have now taken our stove out several times to the woods.  Our stove has served us well, made some fantastic meals and hot beverages. The great thing about this stove is that you can find fuel that burns almost every where. You can take this stove on the mountain, on the plains, in the desert or even on the beach.  I have been on the tundra and on the tundra burning materials can be harder to find.  Materials can be found but you may want to carry fuel when backpacking on the tundra. 

Here is our video showing the hobo stove at work.


Posted by ES Team on 06 October, 2014 camping, ES family, how-to, survival | 0 comments | Read more →

Roughin' It With Bannock

Roughin' it with bannock

If you are going to be out in the woods for a long time, you may want to consider taking Bannock with you. 

Bannock is a quick biscuit–type bread used through out the world. Bannock is a small flat  loaf of bread. Modern Bannock usually has a  leavening agent. There are many different  types of Bannock with different names.   Bannock recipes are simple and designed to be cooked on a campfire. Bannock is great in the woods, warm, light  and filling. It is like manna from heaven.  Add some honey and you will never want to be without it. 

Bannock is Gaelic in origin. There are reports of soldiers eating Bannock on Hadrian's Wall over 1000 years ago. Bannock was primarily in Ireland, Scotland and Northern England till the 1500's. Eventfully Bannock arrived in the new world and was quickly adopted by Native Americans through out North America. Native Americans call their Bannock Fry Bread. But honestly, the controversy rages on whether Europeans brought Bannock to the New World or did they they had fry bread in the Americas long before Europeans arrived. We may not have the answer to that question but we do know that it is common thought that Bannock was favored by nomadic tribes because the dry mixture stayed fresh for long periods. They would add the fat or oil at cooking time.

Bannock is a versatile, quick, great tasting bread. Originally  bannocks were heavy, flat cakes of unleavened barley or oatmeal dough formed into a round or oval shape and cooked on griddles or hot stones. Now a days Bannock ingredients have been modernized, which includes adding a leavening agent, producing a lighter fluffier dough. You can include extras to make your bread interesting such as raisins, currents, blueberries, cinnamon or cheese if desired.

Every outdoors-men should know how to make this bread that sustained hungry voyageurs, settlers, and First Nations peoples alike in the early days of our country. Bannock, also known as fry bread, skaan, scone or Indian bread, is found throughout North American tribes, including the Inuit of the north and down south to the Navaho of Arizona.

Bannock can be fried, baked or cooked around a stick over hot coals. You can also drop spoonfuls of batter in a stew, producing something like dumplings. But most things just taste better cooked over an open fire or that perfect bed of coals and Bannock is one of them.


Cast Iron Pan Bannock
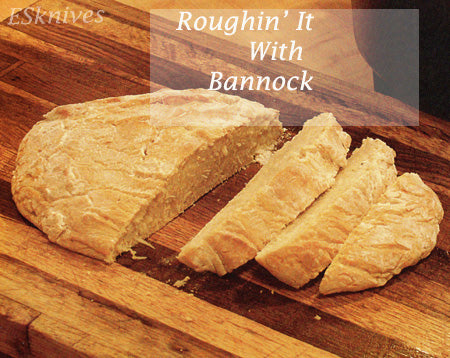
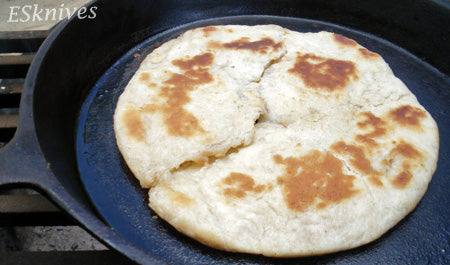
The best Bannock to me is carefully winding it around a stick, cooking it in an open fire, buttering it and just eating it. If you want a little more, cover your bannock with jelly, honey or syrup. Wrap your bannock over an impaled polish sausage or hotdog. To cook your Bannock on a stick dust your hands with flour, spoon up a handful of batter, and use your hands to pat it flat and shaping it onto stick. Make sure your edges are well pushed into each other so your bannock won't separate while baking.  Cook your bannock 7-10 minutes over coals until golden brown. Rotate continually for even baking and prevent burning.

Frying bannock in a cast iron pan is a great way to enjoy this bread. Put a few heaping tablespoonfuls of batter in a hot greased frying pan. Cook much like a pancake, do not use to much oil.  After it has cooked for a few minutes lift the edge with a spatula to keep it from burning.  Flip your bannock when the bottom is golden.  Remove from heat once both sides are browned and cooked.

Bannock Recipe

  • 2 1/2 cups flour
  • 6 tsp baking powder
  • 1/2 tsp salt
  • 2 tbsp sugar
  • 1/3 cup lard
  • 2 eggs, optional
  • 1 cup water or more

Combine the first four ingredients. Add the lard slowly, rubbing it in to form fine crumbs. Combine the eggs with water and add to the flour mixture.   If you are not using eggs just add your water.  Stir your mixture to form a soft dough, and knead briefly.

If using a frying pan to bake, grease the pan then dust with flour. Place about a quarter of the dough in the pan and heat. Bake until the bottom is lightly brown, then flip. Bake about 10 minutes on the opposite side. Bake remaining dough in similar fashion.

If baking in oven, pat down into greased pie plate. Bake in 400 degree oven for about twenty minutes, or until cooked in the middle.  Don't forget you can fry your dough in oil or slap it on a stick.

You can add raisins, dried fruit, nuts, seeds, or whatever you like for a dessert bannock. Bacon bits, diced Spam, dried or fresh herbs, or cheese make a savory bannock.

However you decide to make your bannock it is a great addition to any survival situation, camping trip or some home cooked bread for dinner.

Posted by ES Team on 05 October, 2014 camping, history, how-to, recipes, survival | 0 comments | Read more →

Surviving With Candles

I am constantly looking for simple survival tools.

There is a simple survival tool available to us all.  Candles….

Candles are the perfect survival tools.  Every good emergency kit and bug out bag should include some emergency candles. Candles are used for everything from lighting a room to providing extra heat in an emergency.

Fans of classic survival books will remember the time  it was encouraged to carry around a candle nub for survival purposes. I have been around backpackers all my life.  Some of those old backpackers I knew would not go in the woods without their candle. It seems that many people don’t think about the candle much anymore.

Candles are great for providing you with hours of light. In non-windy conditions, a candle can light your way and give you enough light to work. If it is windy, you can rig a wind screen by cutting a piece off an aluminum can or putting the candle inside a clear glass container.  Now a days you can go to any outdoor store and buy a candle lantern.  They are much lighter than the standard battery lamp.

Copper Lantern Surviving with Candles

Copper Candle Lantern

Let's talk about Cooking. A good candle can actually provide enough heat to cook or boil a small amount of water. You won't be able to use your candle nub to grill up a steak,  but with a candle nub you can generate enough heat to warm up tea, coffee, soups along with many other types of food and drink. Just find a couple bricks or rocks to make a stand that supports your cook pot. Place the nub under the pot, light it you have dinner. We all know it gets cold in the winter. If you find yourself out in the winter an emergency a candle in your tent will provides some nice  extra warmth. It is surprising how much a candle can heat up a small tent. Now that we are mentioning tents,  Candle wax works good in the field for seam sealing those pesky leaks that spring up. Lighting Fires in the woods can be hard. It’s a lot easier, and safer to use a candle to light your fires than it is to hold a lighter or match.  Light a candle and drip some wax on your tinder or kindling.  Light the fire with the candle’s open flame. If you have extra candles you can build the fire around the candle, light your candle and your fire will start with ease.


Surviving with Candles
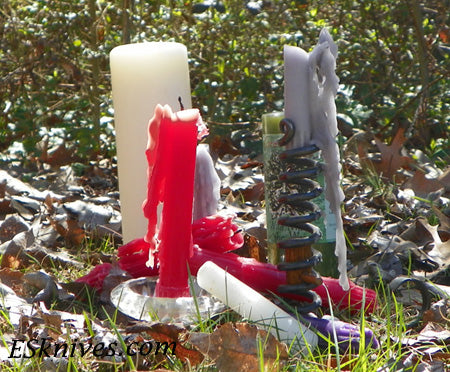
Wax prevents rust.  You can coat your knives, tools and other equipment with candle wax to prevent them from rusting. A thin coat works well and you can renew it as often as needed. Wax also works as a decent lubricant, just rub your candle. You can even use a thin coat of wax on a hat for waterproofing.  The wax won't completely water proof a hat  but it will certainly make it water resistant.
When using a bow drill place a small flake of wax into the bearing block of a bow drill.  As you work your drill it will melt the wax and become slippery. This frees up the top of the drill and focuses the friction at the bottom of the drill.

If there is a serious emergency out in the field, candle wax can be used as an adhesive on cuts and wounds much like stitches.

I have never tried this but I have heard that people warm up some wax and mold it around a fish hook that creates a false grub or maggot.

Bottom line is that things seem to be  getting tougher. Emergency candles are long lasting,  provide safe emergency lighting and are easy to store in survival kits. Power outages are a much more common occurrence than they used to be. Power Outages can occur from wind, snow storms, excessive power demands, floods and earthquakes. We never know when a disaster will occur. Terrorism is on the increase along with floods and hurricanes.  A small investment now can mean the difference between life and death in the future.

Posted by ES Team on 04 October, 2014 camping, fishing, survival | 0 comments | Read more →

Zip Ties, Cable Ties, a Survival Must

Seasoned survivalists know that our gear does not have to be expensive. What we want in our  gear is functionality. We want our gear to be effective. If you have spent some time out in the woods you know you can't do without duct tape. Duct tape is an essential and the cost is minimal. Another essential in my pack are zip ties also known as cable ties.  They are primarily used by electricians. However, they make great fasteners. Mostly designed for  one time use. Cable ties are a must. They are essential for survival, backpacking and Bug out bags.

Cable Ties

Cable Ties

There are so many useful things you can do with a zip tie. They are lightweight, and cheap. A perfect item to throw in as part of your camping gear, into your survival kit, or even incorporate them into your everyday carry gear, these Zip Ties should be something that you don't leave home without.

Black ones are the best because they do not weaken when exposed to sunlight for long periods of time. Keep different sizes with you in your pack for different jobs. I keep the 1/16'" and 1/8" wide 10" to 12"  long ties. They seem the most useful. They take a second to apply, almost impossible to break, or cut.

You can buy reusable cable ties but I have found the one use cable ties work the best. 

Buy American made ties, stay away from china made ties. China made ties tend to snap.

When you are in a survival situation you never know when you’ll need to fasten something, strap something down or tie some up.  Zip ties have a million uses. Almost anything that needs to be held together can be held by zip ties. Your imagination is the limit. 

I have used ties to:

  • Attach items to my pack 
  • Secure a light fixture overhead on a tree branch
  • As emergency shoe laces
  • Lost a button once and a cable tie worked as a replacement
  • Drawn two belt loops together as a quick belt
  • Lashed a knife to a pole for a spear
  • Building survival  shelters
  • Used two cable ties to repair the shoulder buckle on my pack:
My Fixed Pack Buckle
  • Used ties to make a snare for catching prey
  • Secured a tent in place
  • Hold wooden poles together
  • My zipper pull snapped off my jacket and I replaced it with a tie
  • In my garden for tying tomatoes and cucumbers
  • Cable ties allow for one-handed fastening due to their design, which for me having only one arm comes in handy

I have heard of people using ties for:

  • Tying trousers down in tick country
  • Handcuffs when needed
  • As a tourniquet
  • Wrapping together ropes and hoses
  • Boaters using ties for depth markers
  • Used to hold a splint in place
  • Securing a heavy duty plastic crate to an ATV

There are many uses for these lightweight, but effective fasteners. The next time you are getting ready for the trail or putting your bug out bag together, remember your cable ties.

Posted by ES Team on 03 October, 2014 camping, hunting, survival | 0 comments | Read more →

Stay in touch

Contact Us

We'd love to hear from you. Call us at 1-256-486-3493 or send us a quick note from our contact us page and we'll be happy to answer any questions you have.

Latest posts

  • Weekly Knife Giveaway - Claim your Entry

    We're giving away a knife every week through the end of April. Enter today and then bookmark this page to make it easy to claim your additional entries every week.  Read more →

  • Survival with Bandanas

    When I am out in the wild for more than a day I always think about survival. I only want to carry a certain amount of weight. When you are walking around in the wilderness weight is important. You only... Read more →