ESLife
Posts in the hobbies category
Same girl - different make up
Which girl do you prefer? Camo or makeup?Dale Earnhardt explains Gordon to Danica Patrick
Dale Earnhardt explains why Jeff Gordon is really mad...Pinterest Fun
These are some of the best things we've seen on pinterest. Even if you're not on it, check them out.7 Types of Campers (infographic)
Great infographic of the 7 types of campers.Hike the Appalacian Trail
Your guide to Hike the Appalacian Trail

Now that you've reviewed the top thirty five reasons to hike you need to check out the Extremely Sharp Camping section to get your gear!
A wonderful infographic about 35 reasons to hike the appelation trail by the geniouses at 97thfloor.
College Football Fact Sheet

Post by Extremely-Sharp.com. https://www.facebook.com/extremelysharp/posts/594834503895567
Crossbow Aiming and Hunting Techniques
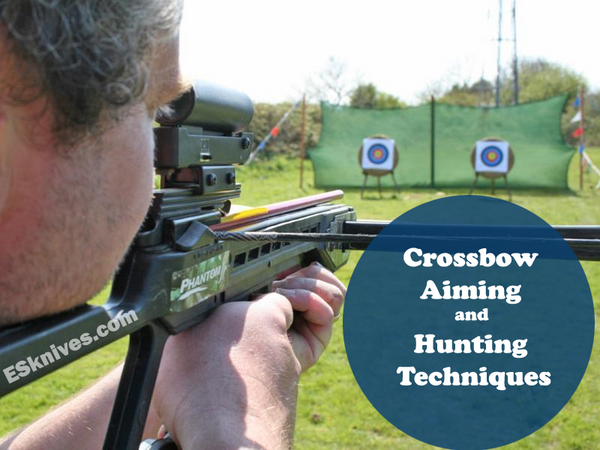
Crossbow Aiming and Hunting Techniques
- Always cock your crossbow consistently in the same place. Failure to do so can lead to off setting of your site. Marking your string while it is at rest with two marks on either side of the stock should remedy this problem.
- The accuarcy of the arrow is two dimensional. The proper combination of arrow and broadhead is needed.
- The smaller the broadhead the better the accuracy, in general.
- The task for the arrow is to correct any play the broadhead might introduce to the flight. It accomplishes this by spinning. A slight offset with straight clamps works very well.
- Trajectory is the key to any good shot. Remember most shots are under 20 yards. There's no point in shooting past that because the variation in the shot will vary too much for any regular sized target or game.
- Assuming you set your site at 20 yards then your trajectory will be one or two inches high at fifteen yards, and two or three inches low at twenty-five yards.
*Note: Care should be taken when shooting from a tree stand since the crossbow stock will kick in a upward direction. Make sure the area around your crossbow is clear of any limbs or other objects before firing.
History of the Crossbow
Literary and physical evidence suggest that the crossbow originated in China during the 4th century BC, though a type of crossbow called the gastraphetes may have been independently invented in Greece at about the same period. It wasn't until the 10th or 11th centuries AD that the crossbow became a significant military weapon in Europe. It passed from general military service in the 16th century, but its use for hunting and target shooting has continued to the present day. The most of following chronology is abridged from GUIDE TO THE CROSSBOW by Paterson:
| 341 BC | Earliest reliable record of crossbow use at battle of Ma-Ling in China. |
| 228 BC | Earliest crossbow artifact, a bronze lock mechanism from the tomb of Yu Wang. |
| 0-100 AD | Heron of Alexandria describes gastraphetes. |
| 300-700 | Roman carvings of crossbows. |
| 385 | Vegetius mentions crossbows in DE RE MILITARIA. |
| 1066 | Crossbows introduced to England by Normans. |
| 1096 | Anna Comnena describes Norman crossbows. |
| 1100-1200 | Composite crossbow lath appears. |
| 1139 | 2nd Lateran Council interdict forbids use of crossbow among Christians. |
| 1192 | Crusader victory at Jaffa aided by crossbows. |
| 1314 | Earliest reliable record of steel lath. |
| 1346 | Genoese crossbowmen defeated at Crecy by English longbowmen. |
| 1373 | Earliest illustration of cranequin. |
| 1503 | First of many English laws restricting possession and use of crossbows. |
| 1550-1600 | Firearms replace crossbows in most Weatern armies. |
| 1860 | Photographic evidence from Chinese shows repeating crossbows still used there as military weapons. |
| 1939-45 | "Arrowspeed" crossbow used by Austrailian commandos in Pacific Theatre. |
| 1945-1975 | Crossbows employed by Montagnard peoples and US special forces during Vietnam conflict. |
| 1960?-present | Crossbows used to shoot anesthetic darts for capturing and treating wildlife; also used to obtain tissue samples from marine animals for obtaining genetic information. |
Crossbow Terms
| ARBALIST | Latin language term for crossbow, derived from arcuballista (also spelled ARBALEST). |
| ARMBRUST | German language term for crossbow which is often preferred in international circles. |
| ARROW | Synonym for bolt which is preferred by some modern crossbow manufacturers. |
| BACK | Side of bow or lath facing target. |
| BALLISTA | Roman seige engine similar to oversized crossbow. |
| BARREL | Section of the stock between the latch and lath; sometimes used as synonym for track. |
| BARRELED CROSSBOW | Crossbow having a tubular barrel rather than a track; used to shoot balls, usually of lead; synonym for slurbow. |
| BASTARD STRING | String to brace a crossbow for installation of bowstring; synonym for bracing string. |
| BELLY | Side of bow or lath facing shooter. |
| BELT HOOK | Metal hook(s) attached to belt to aid cocking. |
| BENDING LEVER | Hindged lever to aid cocking; pushes string back using lugs or a ring mounted at front of crossbow; provides mechanical advantage of about 5:1, varying with lever length. |
| BINDING | See BRIDLE. |
| BOLT | Short projectile for crossbow resembling arrow. |
| BOLT CHANNEL | See TRACK. |
| BOW | See LATH. |
| BOW IRONS | Metal fittings used to secure lath to stock; usually tightened with metal wedges. |
| BOWSTEEL | Steel lath. |
| BOWSTRING | String used on all archery weapons to transfer force from bow to projectile. |
| BRACED | Position of bowstring when mounted on bow or lath, but not cocked. |
| BRACED HEIGHT | Distance between braced bowstring and belly side of riser, measured from the bowstring's center. |
| BRACING STRING | See BASTARD STRING. |
| BRIDLE | Binding, usually of twisted sinew cord, used to tie lath to stock on medieval crossbows. |
| BULLET CROSSBOW | Crossbow designed to shoot bullets; generally used in reference to double-string types. |
| BUTT | Rearmost portion of crossbow stock; also refers to earthen mound used in long range target shooting, and as a general term for backstop. |
| CATCH | See LATCH and SAFETY. |
| CENTER-SHOT | Bow or crossbow lath designed so that the arrow/bolt passes through its center; center-shot crossbows often have two separate limbs. |
| CLEAN DRAW | See POWER STROKE. |
| CLIP | Spring used to retain bolt to cocked crossbow prior to shooting; usually made of horn or metal. |
| CLOUT | Long range archery shooting. Modern practice uses a horizontal target 15 meters in diameter outlined with flags; scoring is determined by measuring distance from center. |
| COCK | To draw bowstring from braced position to latched position. |
| COCKING LUGS | Metal protruberances on crossbow for anchoring bending lever, cranequin or goat's foot. |
| COCKING PEG | Peg required to set some crossbow trigger mechanisms prior to cocking. |
| COCKING RING | Metal ring bound to the front of the lath to anchor bending lever. |
| COCKSCOMBING | Method of serving sometimes used on loops of crossbow bowstrings. |
| COMPOSITE | Combination of materials used to construct lath including horn, wood, sinew and baleen. |
| COMPOUND | Modern lath construction using cables and eccentric pulleys. |
| CORD AND PULLEY | Cocking aid consisting of cord with ends attached to crossbow butt and user's belt running through a pulley attached to bowstring; provides mechanical advantage of 2:1. |
| CRANEQUIN | Cocking device using rack and pinion; can provide mechanical advantage of about 145:1, varying with size and number of teeth. |
| CROSSBOW | Archery weapon consisting of a lath mounted to a rigid stock, having a mechanical means to hold and release the drawn bowstring. See also ARBALEST, ARMBRUST, BARRELED CROSSBOW, BULLET CROSSBOW. |
| DOG'S FOOT | See GOAT'S FOOT |
| DOUBLE STRING | Complex form of bowstring designed to launch round projectiles from crossbow; has leather pouch at center to hold ball. |
| DRY-FIRE | To release cocked bowstring without projectile; term borrowed from firearms. |
Sword Terms
Terms used to describe the Japanese Sword Blade
| Aikuchi | Small tanto (knife) without a tsuba (hand guard). Carried concealed inside the clothes, often by women. |
| Ashi | Small channels of softer steel extending from the ji into the hamon. Literally "Legs". This irregularity in thehamon is said to prevent large sections of the cutting edge from being broken off at any one time. |
| Ayasugi | A type of jihadda of regular wavy lines produced by selectively filing away sections of the masame patterned steel block when the blank for the sword is being made. |
| Bo'hi | A wide groove or Hi. |
| Boshi | Pattern of the hardened edge on the point. |
| Choji | Clover or mushroom shaped hamon. |
| Chokuto | Straight sword |
| Gunome | Semi circular wave shaped hamon. |
| Ha | Cutting edge |
| Habuchi | The line defining the edge of the hamon, the transitional zone from hard to soft steel. |
| Hada | Forging marks |
| Hamachi | Notch marking the beginning of the sharpened edge |
| Hamon | The pattern of the hardened, martensite steel as it shows on the side of the blade including the transition zonehabuchi to the softer pearlite steel. |
| Hi | Groove in the upper side of the blade. |
| Hitasura choji | Choji shaped hamon, with a mottled blade. |
| Horimono | Carving or engraving on the blade |
| Inazuma | Streaks of hardened steel in a vertical zig-zag pattern in the transition zone habuchi. Literally means "lightning bolts". |
| Itame | Wood-like grain in the steel, produced by using the hammered face of the forged steel block as the side of the blade. It is similar to the side grain in a block of wood, with irregular rounded shapes. |
| Ji | Blade surface above the hamon |
| Jihadda | Pattern on the surface of the blade or ji. |
| Jitetsu | The color and texture of the steel as seen on the surface of the blade or ji. |
| Katana | The katana replaced tachi in the middle of the Muromachi period and was in use until the very end of the Edo period. They were 60.6 cm (2 shaku) long or more. Often worn as part of a pair of swords with a shorterWakizashi during the Edo period. Displayed blade up. |
| Ken | Straight sword made in early Japan. It was replaced by the tachi in the Heian period. |
| Kinsuji | Horizontal streaks of hardened steel in the transition zonehabuchi. Literally means "golden lines". |
| Kissaki | Point of Sword |
| Ko Nie | Small particles of hardened steel, martensite crystals, in the habuchi between the size of nie and nioi. |
| Ko notare | Shallow irregular undulations in the hamon. |
| Masame | Wood-like grain in the steel, produced by using the un hammered edge of the forged steel block as the side of the blade. It is similar to the end grain in a block of wood, with fine regular lines that are closely spaced. |
| Mei | Signature of the Sword Smith |
| Mekugi ana | Peg hole in the tang |
| Motohaba | Width at machi |
| Mune | Back surface |
| Mune-machi | Notch at back marking top of tang |
| Nagasa | Length of the blade |
| Nakago | Tang or handle end of the sword. |
| Nie | Small particles of hardened steel, martensite crystals , in the habuchi large enough to be seen with the naked eye. |
| Nihonto | Japanese Swords. Includes ken, naginata, yari, tachi, katana, wakizashi and tanto. |
| Nioi | Small particles of hardened steel, martensite or perlite, in the habuchi, too small to be seen individually with the naked eye. They appear as misty areas. |
| Notare | Irregular undulations in the hamon. |
| Omote | Front |
| Sakihaba | Width at yokote |
| Shinogi | Ridge line, defining the edge of the blade |
| Shinogiji | Blade surface above Ridge line |
| Sori | Amount of curvature of the blade |
| Suguha | Straight hamon. |
| Suriage | A shortened tang often due to shortening a tachi to akatana. |
| Tanto | A knife, shorter than a wakizashi. |
| Tachi | Long sword used by the early Samurai from horse back. From the Heian through the early part of the Muromachi period. Tachi usually have a high curvature, sori, and the length is usually between 65 and 70 cm. Displayed blade down. |
| Togi | The polish of the blade. This goes beyond sharpening the blade to a fine finnish to the steel that allows the features of the steel to be seen. |
| Toran | Wave shaped hamon. |
| Ura | Back |
| Utsuri | Whitish effect on blade surface, ji outside of the hamon. Literally means "reflection" and may follow the lines of the hamon. |
| Wakizashi | Shorter sword worn as a pair with the longer katana. The cutting edge is between 12 inches and 24 inches in length. Displayed blade up. |
| Yakiba | Cutting edge |
| Yasurime | The file marks on the nakago (tang) |
| Yokote | Line dividing point from body |
Terms used to describe the Japanese Sword Mounting
| Fuchi | Collar of the Hilt, near the tsuba |
| Habaki | Metal Collar used to prevent the sword from touching the inside of the saya |
| Ito | Braid wrapped on the hilt to hold it to the tang. It is wrapped over the menuki to hold them in place. |
| Kashira | Butt cap on the end of the hilt. |
| Koshirae | The entire sword mounting including the saya, tsuba, tsuka, menuki, habaki, kashira, sageo and other fittings. |
| Kurikata | Knot used to tie the sageo to the sword scabbard. |
| Medugi | Peg used to affix the tsuka to the tang |
| Menuki | Ornament placed over the peg that holds the hilt to the tang |
| Sageo | Cord used to tie the sword scabbard to the belt while being worn. |
| Same' | Ray skin used to cover the hilt. |
| Saya | Scabbard |
| Shirasaya | Plain wooden "resting" scabbard used to store a blade |
| Tsuba | Sword Guard |
| Tsuka | Hilt or Handle |
Sword Making Terminology
| Age gitae | Finnish forging. Several pieces of steel formed in the foundation forming shita gitae are folded together several more times. |
| Denkai tetsu | Iron made from scrap iron in an electrolytic furnace, it is 99.99% pure iron. The smith adds the appropriate amount of carbon in his forge using the process of oroshigane. |
| Hagane | Harder (higher carbon content) steel used just for the cutting edge of the blade when it is constructed in thehon sanmai gitae method. |
| Hizu-kuri | Shaping of the blade from the sunobe. The blade is heated and beaten to shape a small section at a time. The blade will be ready for shiage next. |
| Hon sanmai gitae | A less common form of sword construction, using three pieces of harder steel kawagane for each side of the blade a piece of soft shingane as the core and a special piece of harder steel hagane for the cutting edge. |
| Kera | The raw steel produced in the tatara. About half of the steel is tamahagane and ready for use to make a sword. The remaining steel can be used after the carbon content is adjusted by oroshigane in the smiths forge. |
| Kaji-oshi | Final shaping of the blade with a draw knife, files and rough polishing done by the smith. |
| Kangan tetsu | Sponge iron made in the smelter without oxygen. The smith adjusts the amount of carbon in his forge using the process of oroshigane. |
| Kawagane | Harder (higher carbon content) steel used as a starting material to make the body of the sword. The carbon content is between 1.0 and 1.5 percent. |
| Kitae | Forging or folding the steel bar to prepare it for making the blade. |
| Kobuse gitae | The most common form of sword construction, a jacket of kawagane with a piece of soft shinganecore. |
| Nakago-shitate | Finishing the tang with a file |
| Omura | The omuna stone is pulverized into a powder used in the clay slurry the sword is coated with duringtsuchioki. |
| Oroshigane | The process used to adjust the carbon content of steel using the forge. The carbon level is increased by heating the steel starting at the top of the charcoal in the forge and continuing to burn new charcoal until the steel has reached the bottom. The carbon content of steel is reduced by placing it around the air vent at the bottom of the forge and heating it so that the oxygen combines with the carbon in the steel and is exhausted as carbon monoxide. |
| Satestu | Iron oxide sand used in the smelter to make the steel. |
| Sen | The draw knife used to shape the blade. It is made with a very hard steel blade and works like a plane, scraping away thin layers of metal with each stroke. |
| Shiage | Shaping the blade with a draw knife and file. The surface of the blade is prepared for the application of the clay in tsuchioki. This is done after hizukuri. |
| Shingane | Core steel. Softer (lower carbon content less than 0.5%) steel used to make the core of the sword. |
| Shitagitae | Foundation forging. The first six folds during the forging process. |
| Soriaoshi | Adjusting the curvature of the blade, following yaki ire. |
| Sunobe | Blank steel bar, ready to be forged into a sword. |
| Tamahagane | Raw steel used to make the body of the blade. |
| Tatara | The smelter. It burns charcoal with iron oxide sand to form the tamahagane. |
| Tanren | The process of welding together several smaller pieces of steel into a single block, then it is hammered flat and folded twelve to fifteen times normally cross-wise. This creates the jihadda of the finished sword. |
| Tsuchi-oki | Coating the blade with a slurry containing clay, charcoal powder and pulverized omura stone, prior to hardening. The thickness of the clay coating determines the speed of cooling when the hot blade is quenched in water during yaki ire. The portions of the blade that cool quickly form hard steel structure, the portions of the blade that cool slowly convert back to the softer steel structure. This determines the pattern of the hamon on the finished sword. |
| Tsukuri-komi | A soft core of shigane is placed in a groove in the steel formed during tanren. This is then used to form the sunobe. The shigane or soft steel has been forged previously. This core of softer (lower carbon content steel) in the blade gives the sword resilience and helps prevent the sword from breaking. |
| Tsumiwakashi | Assembling the Steel Bock for forging. Small pieces of kawagane are piled into a stack, they are wrapped in paper and dipped in clay slurry. This is heated and beaten to weld it into a single piece of steel and drive out impurities. |
| Yaki-ire | The hardening of the steel by heating and quenching in water. The cutting edge of the blade has a thin coat of clay while the rest of the sword has a thick coating of clay. When steel is heated to between 700 C to 900 C the crystalline steel changes to the structure called austentite. When it is cooled quickly, where there is thin clay, it changes to martensite. The rest of the steel cools slowly enough that it changes back to it's original ferrite or pearlite forms. The blade also gets most of it's curvature due to the differential expansion of the thin edge and the thicker back of the blade. |
| Yaki-modoshi | Tempering the blade to relieve internal stresses afteryaki ire. The blade is heated to about 150 C and quenched in water. |
Terminology used to talk about Sword Smiths
| Ningen Kokuho | National Living Treasure or (Designated as the Owner of the Important Infinitive Cultural Asset) |
| Masamune prize | Supreme prize awarded to the best submission by a Mukansa Smith at the annual Sword Making Competition |
| Mukansa | A Swordsmith who has been promoted above the general Sword Making Competition and is only judged against other Mukansa. |
Other Terms used when identifying the origin of a sword.
Kantei
| Ato Mei | A signature of a sword smith added latter, not by the smith himself. These are considered to be correct, and do not match the smiths signature on purpose. The features of the sword itself, support this attribution. |
| Bizen | One of the five regional traditions of Japanese Sword making. |
| Dai Mei | A blade made by a master smith and signed by the student who assisted. |
| Dai Saku | A blade made by a student under the direction of a master smith and signed by the master. This is often considered to be equivalent to the work of the master. |
| Gendaito | Modern or contemporary swords made after 1876 or so. |
| Go Kaden | The five traditions of Sword Making. Usually a sword can be placed in one of the five tradtions as the first step in Kantai. |
| Gimei | A false signature Mei, added to the sword in an attempt to deceive. |
| Gunto | Swords made for the Japanese Military during World War II. Often they were not made in the traditional way. |
| Kantei | The act of identifying the origin of a blade. This includes the time it was made, the place and the smith who made the sword. |
| Koto | A sword made before about 1573. |
| Mumei | A sword without a signature from the smith. |
| Mino | One of the five regional traditions of Japanese Sword making. |
| Oshigata | A rubbing or drawing of the sword showing it's features. It may be of the entire blade or only the nakago (tang) to show the mei (signature). |
| Shinsakuto | Newly made sword. |
| Shin Shinto | A "new new" sword made between about 1772 to 1925. |
| Shinto | A "new" sword made between about 1573 and 1760. |
| Sho shin | A true and genuine blade (or other item). |
| Soshu | One of the five regional traditions of Japanese Sword making. |
| Yamashiro | One of the five regional traditions of Japanese Sword making. |
| Yamato | One of the five regional traditions of Japanese Sword making. |
How to Fillet a Fish
Knowing what to do after you catch a fish is an important part of angling. To be a true angler you have to be able to prepare your catch. Learning to Filet your fish is a must for most anglers.

I catch mostly fresh water fish. The fish I filet most are crappie. I may fillet a Bass from time to time but I usually release the Bass I catch. I do love large blue gill, shell crackers and crappie. My favorite fish to eat is a walleye. We don't have walleye here in Alabama but we do have sauger which is related to the walleye. We catch sauger here in in winter and the stay deep. They are great eating.
There is an urban myth that you loose a lot of the meat by filleting. This is not true. You will lose a little but not much and having no bones in your fish makes up for the small loss.
Keep your fish fresh. If you don't have a live well or a fish basket you can keep your fish on ice. This will keep them fresh till you are ready to clean them. You can filet a fish right out of the live well but my experience has been that they filet better after they have been iced down. The knife seems to flow through the meat easier on an iced down fish.
I Always use a filet knife. Filet knives are thin sleek blades made to cut through fish. Any other knife will be to thick and cumbersome. You will end up butchering the meat. I like a Kershaw filet knife. They are great knives and reasonable priced. You can find a nice Kershaw for around $15.00
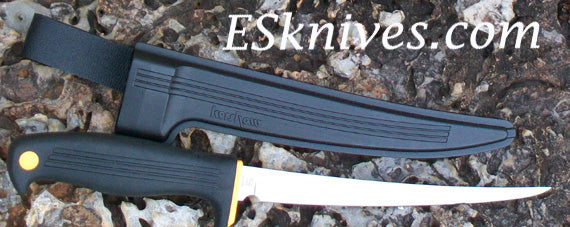
There are anglers out there that use an electric knife. I guess I am a little old fashioned but my experience has been that a filet knife gives a much better filet than the electric knife.
 Keep your knife sharp. A dull blade is useless when filleting. If your blade is stainless make sure you run it on a steel or ceramic before you use it. People like stainless blades because stainless is rust resistant. The downside to stainless is that stainless does not keep an edge like a carbon blade. So with a stainless blade run it down your steel orceramic before each fish. That will keep it sharp and able to do the job.
It takes a certain amount of touch to fillet a fish but with a little practice you will be filleting as a pro. After all we are not talking about brain surgery here.
To skin or not to skin, I like the skin on most freshwater game fish. Catfish I skin with needle nose pliers. If you decide to keep the skin you will need to scale your fish before filleting. I have found that a metal spoon makes one of the best fish scalers you'll find. You can spend lots of money on fish scalers but none of them store bought scalers will outperform the common kitchen spoon. If you decide to skin your fish I have found that running your blade between the meat and the skin after you have your filet is the easiest and fastest way to remove the skin.
Here are a few pointers when filleting. To really get a good idea on technique take yourself to you tube and watch a few videos on filleting a fish. After you read our suggestions. The suggestions will make a lot more sense after viewing a few videos.
1. Make a deep cut just behind the gills (about halfway through the thickness of the fish).
2. Cut a slit a few inches in length along the top of the fish (the dorsal side). (There is a slightly different technique for y-bone fish like northern pike or muskees.)
3. Using the tip of the knife, separate the flesh from the bones. The fish should open up just like a book.
4. When completely open, finish cutting away the fillet by moving the knife along the spine of the book.
After you are done with your fish you can be good to earth by recycling. The leftover fish parts make great chum, great catfish bait and great fertilizer.
=======================================

Categories:
Recent posts
- Weekly Knife Giveaway - Claim your Entry19 February, 2016
- Survival with Bandanas23 November, 2015
- Win a trip to go support our troops09 October, 2015
- NASA Released Truly Breathtaking New Footage Of Earth in 4K13 August, 2015
- Kickoff to Summer - get outdoors19 June, 2015
- Stock Photos - group 707 June, 2015
- Stock Photos - group 607 June, 2015
- Stock Photos - group 507 June, 2015
- Stock Photos - group 407 June, 2015
- Stock Photos - group 306 June, 2015


