ESLife

Posts in the how-to category

Stickin with the Cold Steel Sure Strike Shuriken

People love throwing stuff.  We at ESKNIVES love to throw knives and throwing stars. There is nothing more satisfying than hearing that "thunk" sound as a blade sticks in the wooden target.

Shurikens are a lot of fun.  I thought I would write in this article about Cold Steel Shurikens. Cold steel Sure Strike Throwing stars are a great way to get started in the throwing game. 

Sure Strikes aren't like the cheap, shoddy throwing stars you see at flea markets, guns shows, and in martial arts magazines. That's because they are laser cut from high carbon steel that's been heat treated to a hard spring temper before sharpening and then given a black, baked-on epoxy finish to protect them from the elements.  Professionally weighted, balanced and  fully sharpened ends.   Remember that these are serious weapons and not toys.  They will hurt people if not handled responsibly.


Cold Steel Shuriken

Cold Steel Sure Strikes

The Cold Steel Sure Strikes are modeled after the Shuriken that has been used for centuries in China and Japan.  Sure Strike throwing stars come in three sizes, light, medium and heavy.  Points are sharp and no need for sharp edges.  You can throw them for a long time without dulling the point.   They fly effortlessly. You can throw the sure strike  overhand like a baseball, side arm, underarm or back hand like a flying saucer.  When thrown straight,  it hits on at least one point every time.   That's why they are called Sure Strikes.

All three share the same sized diameter of 5.75".  Where they very is in thickness which varies the weight.  The light is 2mm thick at 2.8 oz, The medium is 4mm thick at 4.2 oz and the heavy comes in at 6mm and 6.4 oz. 


Sure Strikes-Light, Heavy and Medium

These sure strikes really help to get your ninja on.  I have thrown all three sizes.  I prefer the heavy sure strike.  The heavy sure strike is a heavy thick piece of steel.  They seem to stick better than the light.  The one problem I have encountered is when they stick, sometimes I have to  pull them out of the target with pliers.  After throwing them for awhile, I preferred the overhand method as opposed to the underhand (frisbe like) throw.

I have found that they live up to their name sure strike,

You throw them they stick. Even the light version did well. It still has some weight behind it and easily sinks into what ever you throw it at.

Great for new people. These stars stick each time and help boost your confidence. You don't have to be that good to make one stick. Take it from me, I used to be right handed before I lost my arm and even I can make them stick with a left hand throw. After continued use the paint on the outside will rub off some to reveal the silver metal.

These are the stars that stick every time, the Sure Strikes from Cold Steel. Have fun with them and be safe!

Posted by ES Team on 20 October, 2014 hobbies, how-to, martial arts | 0 comments | Read more →

Charming the Fiddle Worms - Fishing Bait

Fiddle worms make excellent bait for catfish, bass, bream, and trout. They are especially valuable because of their length: One worm, broken apart, will easily fill several hooks, and the worms are tough enough to stay securely in place. Charming worms is a southern tradition. Fiddling  is still used in certain parts of the southeastern U.S. today, though it probably reached its peak during the 1960’s. Charmers are hard to find now a days.

In North Alabama this is how many of us catch our own bait.  Where I come from Fiddling worms is considered a art.  First time I saw worm fiddling was when I was around 10 years old.  I was a city boy and we were vising my Uncle and Aunt on top of  Brindlee Mountian in  North Alabama, the foothills of the Appalachian Mountains.  My Uncle showed my dad and I how it was done.  In minutes we had a bucketful of worms, ready to go fishing.

Fiddling worms 

My Uncle got us a bucket of worms with nothing more than an old  rusty handsaw missing a few teeth and a bucket. He told us that the best time to go worming is in the spring but I have found that you can capture worms any time of the year, unless the ground is frozen.

There have been studies that confirmed worm grunters (another name for fiddling) have actually been tricking these worms into thinking they are being chased by its primary predator; moles. That’s why they appear above the ground almost like magic. They are in fear for their lives and quickly crawl from their burrows to escape.

Here is how we do it:

The success of worm charming can often depend on soil conditions, with charmers choosing damp locations or using water to attract the worms. A crucial factor in finding a good site to "play up" the worms is to have good moisture in the soil. Fiddle worms like the earth damp.  In dry weather they move down into the lower parts in search of water. The first thing is to look for is good soil.

When you've located an area you believe there may be worms, begin to look for worm  casings. Worm casing is another term or worm poop, which are small, round casings that the worms discharge as they munch on the soil.  Casings can be found easily among decaying leaves at the base of a young trees.

Once you have found a small sapling, around three inches in diameter, it is time to start fiddling. Cut your sampling and leave around 18" for a the stump. Before you go out cutting peoples trees down, ask for permission.

Take an old wood saw, that the teeth have been dulled, and start fiddling by simply dragging the cutting edge back and forth across the top of the stump. The vibrations that are created travel down the tree's root system, sending tremors down into the earth that jolt the worms to the surface. In good damp ground you'll start seeing worms in five minutes maybe sooner. Dryer soil will take longer. Give it at least 10 minutes before looking for a new site. Just keep playing and worms should appear, they might be as far as 25-30 feet away. Fiddle worms on an average are between 12 and 15 inches long.

When your worms begin to surface, collect them in a bucket.  Make sure your bucket has some holes.  You don't want your worms to drown.  Fill your bucket with dirt.   You can keep them in the bucket for up to two months.  Keep them watered which means keep them moist.  Throw in a little cornmeal every once in a while.

If you can't find a worn out saw, there are other methods of fiddling for bait.  Instead of  a saw you can use a metal bar and instead of a sapling you can use a wooden stake.  Find a roughly 3-foot long wooden stake and pound it about halfway into the ground.   Take a piece of flat, or round iron, roughly half as long as the stake and run it across the stake.  You'll have to lean into it because you want those vibrations to go deep into the ground.  This method will get good results.

There is a technique that involves a chainsaw. Take the chain off your chainsaw. Start your chainsaw and hold it against the ground. This usually brings up buckets of worms. A friend gave me a long metal pole that you plug in and shove it in the ground. I don't know if it works but I have it. I have known people to take a big rock and hit their sapling stump over and over to get worms. This technique is a little to rough for me.

Whatever technique you use it is best to start around sunrise. After 11:00 it is time to give up. My experience has been that temperature does not matter but the ground can't be frozen.  You can sprinkle  your spot with with water, tea or even beer for a slight edge. Some grunters poke their area with a pitchfork before fiddling. The point is to start fiddling, practice, experiment and create techniques that work for you.

Fiddling worms tool 

Don't worry about having to many worms. Bait shops and fishing camps love to buy fiddle worms. You may be able to sell the leftovers. 25 worms in a large Styrofoam cup, a few contacts and you are on your way to worm profits.  Get the whole family involved. Kids love to fiddle worms.  Bring several buckets.

A pile of worms
Posted by ES Team on 18 October, 2014 ES family, fishing, get outdoors, how-to | 0 comments | Read more →

How to Use The Backpacking Hobo Stove Great Survival Tool

Backpacking Hobo Stove Great survival tool

In the last article I explained how to make a hobo backpacking stove and now in this posting it seems appropriate to explain the why.

There are many different types of stoves to take with you to the back country. There are some very expensive and fancy stoves out there.   If money is an issue, there are some inexpensive stoves. There are many different types of fuels that can be chosen. White gas, butane, esbit,  and wood are just a few. The problem with many of your stoves is the weight. Most weigh over a pound and then you have your fuel. The more days you are out the more fuel you have to carry.

The wood stoves on the market are rather heavy but there is no fuel to carry. Esbit stoves are light weight but there is fuel that has to be carried. Esbit tablets don't weigh much but when you are trying to shave off pounds from your pack ounces count. For every 16 ounces you can shave off you have dropped the weight of your pack by a pound. In your living room a pound does not seem like much. After several days and 15 miles a day on the trail, each added pound becomes a burden.

Being an ultra lite backpacker, I am always trying to find ways to shave off ounces. The backpackers kitchen is a great place to focus on unneeded weight. I wanted to be able to get my whole kitchen, which means, stove, pot, tinder, fire starter and other cooking supplies, down to 16 ounces. To do that I would have to give up carrying fuel.

I have always been intrigued by hobo stoves. They are usually made with coffee cans and coffee cans are to large and to heavy to carry in the woods. Besides metal coffee cans are hard to find now a days. What I needed was a hobo design but smaller.


backpacking hobo stove survival tool


My son and I began to measure cans.  I am sure we looked a little funny at the local grocery store measuring cans.   We first measured soup cans.  We could of made a soup can work but it was smaller than we wanted and our pots would not fit inside a soup can.  After looking at many cans we decided on the classic V-8 can.  The V-8 can was workable, had a good weight and our pots would fit in the can, taking little space in the pack.

After we built the stove we had to try it out.  First we put our kitchen together and it fit in the pot tight. The stove and kitchen weighed in at 14 ounces. We beat our goal by 2 ounces.  The only thing left was to try it out.

We got some simple tinder, cotton balls, and some small sticks.  We started the cotton balls with our fire starter and started feeding sticks into the flames.  It was a great success, better than I imagined.  We had three cups of water boiling in 7 minutes. That is a lot of water to boil in a small amount of time. 

We have now taken our stove out several times to the woods.  Our stove has served us well, made some fantastic meals and hot beverages. The great thing about this stove is that you can find fuel that burns almost every where. You can take this stove on the mountain, on the plains, in the desert or even on the beach.  I have been on the tundra and on the tundra burning materials can be harder to find.  Materials can be found but you may want to carry fuel when backpacking on the tundra. 

Here is our video showing the hobo stove at work.


Posted by ES Team on 06 October, 2014 camping, ES family, how-to, survival | 0 comments | Read more →

Roughin' It With Bannock

Roughin' it with bannock

If you are going to be out in the woods for a long time, you may want to consider taking Bannock with you. 

Bannock is a quick biscuit–type bread used through out the world. Bannock is a small flat  loaf of bread. Modern Bannock usually has a  leavening agent. There are many different  types of Bannock with different names.   Bannock recipes are simple and designed to be cooked on a campfire. Bannock is great in the woods, warm, light  and filling. It is like manna from heaven.  Add some honey and you will never want to be without it. 

Bannock is Gaelic in origin. There are reports of soldiers eating Bannock on Hadrian's Wall over 1000 years ago. Bannock was primarily in Ireland, Scotland and Northern England till the 1500's. Eventfully Bannock arrived in the new world and was quickly adopted by Native Americans through out North America. Native Americans call their Bannock Fry Bread. But honestly, the controversy rages on whether Europeans brought Bannock to the New World or did they they had fry bread in the Americas long before Europeans arrived. We may not have the answer to that question but we do know that it is common thought that Bannock was favored by nomadic tribes because the dry mixture stayed fresh for long periods. They would add the fat or oil at cooking time.

Bannock is a versatile, quick, great tasting bread. Originally  bannocks were heavy, flat cakes of unleavened barley or oatmeal dough formed into a round or oval shape and cooked on griddles or hot stones. Now a days Bannock ingredients have been modernized, which includes adding a leavening agent, producing a lighter fluffier dough. You can include extras to make your bread interesting such as raisins, currents, blueberries, cinnamon or cheese if desired.

Every outdoors-men should know how to make this bread that sustained hungry voyageurs, settlers, and First Nations peoples alike in the early days of our country. Bannock, also known as fry bread, skaan, scone or Indian bread, is found throughout North American tribes, including the Inuit of the north and down south to the Navaho of Arizona.

Bannock can be fried, baked or cooked around a stick over hot coals. You can also drop spoonfuls of batter in a stew, producing something like dumplings. But most things just taste better cooked over an open fire or that perfect bed of coals and Bannock is one of them.


Cast Iron Pan Bannock
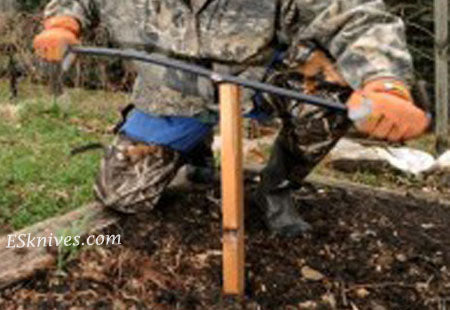
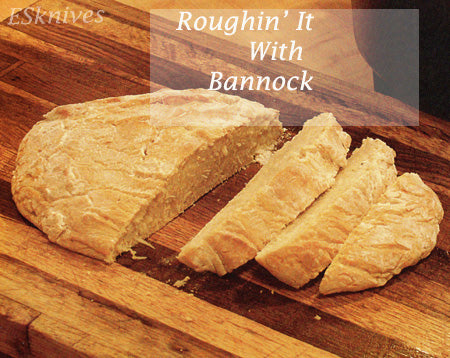
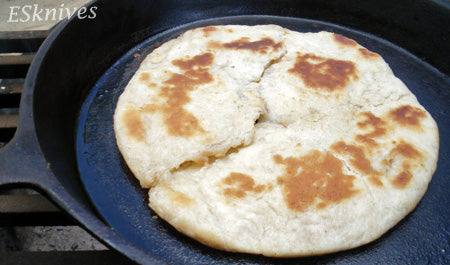
The best Bannock to me is carefully winding it around a stick, cooking it in an open fire, buttering it and just eating it. If you want a little more, cover your bannock with jelly, honey or syrup. Wrap your bannock over an impaled polish sausage or hotdog. To cook your Bannock on a stick dust your hands with flour, spoon up a handful of batter, and use your hands to pat it flat and shaping it onto stick. Make sure your edges are well pushed into each other so your bannock won't separate while baking.  Cook your bannock 7-10 minutes over coals until golden brown. Rotate continually for even baking and prevent burning.

Frying bannock in a cast iron pan is a great way to enjoy this bread. Put a few heaping tablespoonfuls of batter in a hot greased frying pan. Cook much like a pancake, do not use to much oil.  After it has cooked for a few minutes lift the edge with a spatula to keep it from burning.  Flip your bannock when the bottom is golden.  Remove from heat once both sides are browned and cooked.

Bannock Recipe

  • 2 1/2 cups flour
  • 6 tsp baking powder
  • 1/2 tsp salt
  • 2 tbsp sugar
  • 1/3 cup lard
  • 2 eggs, optional
  • 1 cup water or more

Combine the first four ingredients. Add the lard slowly, rubbing it in to form fine crumbs. Combine the eggs with water and add to the flour mixture.   If you are not using eggs just add your water.  Stir your mixture to form a soft dough, and knead briefly.

If using a frying pan to bake, grease the pan then dust with flour. Place about a quarter of the dough in the pan and heat. Bake until the bottom is lightly brown, then flip. Bake about 10 minutes on the opposite side. Bake remaining dough in similar fashion.

If baking in oven, pat down into greased pie plate. Bake in 400 degree oven for about twenty minutes, or until cooked in the middle.  Don't forget you can fry your dough in oil or slap it on a stick.

You can add raisins, dried fruit, nuts, seeds, or whatever you like for a dessert bannock. Bacon bits, diced Spam, dried or fresh herbs, or cheese make a savory bannock.

However you decide to make your bannock it is a great addition to any survival situation, camping trip or some home cooked bread for dinner.

Posted by ES Team on 05 October, 2014 camping, history, how-to, recipes, survival | 0 comments | Read more →

Bad Weather Car Kit

Be Prepared.


The south has had some bad weather the last month. It's about time to learn how to prepare for it just in case you get caught in another snowpocalypse. Ice on the roads can leave you stranded. We put together this list of the minimum for your southern bad weather car kit preparedness.

We understand that the south has warm ground, so new falling snow will freeze to black ice immediately.  It isn't the same as the north on the roads and with horror stories of 8-14 hours of being stuck in cars and roads closing... you want to make sure you've prepared yourself with a few essentials. You may want to include something for traction like sand/catlitter/salt - if you're going for gold on this. I've also heard of people adding toilet paper. Smart move.The south has had some bad weather the last month. It's about time to learn how to prepare for it just in case you get caught in another snowpocalypse. Ice on the roads can leave you stranded. We put together this list of the minimum for your southern bad weather car kit preparedness. 

Although an ice scraper might seem like an obvious snowy weather must, many people forget about important items such as a pocket knife and a couple of bottles of water! You don’t want to forget about the essentials people.

Please leave other ideas for what to keep in an emergency kit in the comments below.  And don't forget to visit www.extremely-sharp.com for help in the future.

Posted by ES Team on 02 October, 2014 how-to, survival | 0 comments | Read more →

Stay in touch

Contact Us

We'd love to hear from you. Call us at 1-256-486-3493 or send us a quick note from our contact us page and we'll be happy to answer any questions you have.

Latest posts

  • Weekly Knife Giveaway - Claim your Entry

    We're giving away a knife every week through the end of April. Enter today and then bookmark this page to make it easy to claim your additional entries every week.  Read more →

  • Survival with Bandanas

    When I am out in the wild for more than a day I always think about survival. I only want to carry a certain amount of weight. When you are walking around in the wilderness weight is important. You only... Read more →